How to install Fedora Minimal with Snapper
2022-11-16
The goal: Get a “riceable” Linux setup that can be rolled back in a flexible manner, by running a clever OpenSUSE tool on a non-OpenSUSE distro. Make a system that is difficult to break in a way that will waste a whole day getting it working again. All the fun of Linux desktop ricing, but none of the risk.
Snapper? But what about Silverblue? #
Silverblue is a fantastic project that intends to introduce the concept of immutable operating systems to the Linux desktop and server. It does this by packaging an entire set of operating system files together, updating it all at once when you reboot the system. Currently, there are four OSTree-based projects, one that includes system files for GNOME desktop (Silverblue), another that provides system files for a KDE desktop (Kinoite), as well as an IoT platform (Fedora IoT) and a headless container platform (CoreOS).
This system is broadly similar to how Windows, Android, macOS, and iOS work.
Analogy: Windows Update

Windows manages the files under C:\Windows\System32 and prevents the user from modifying them with loose technical restrictions imposed by Windows Explorer. Applications like notepad.exe and all the various dynamically-linked libraries Windows comes with are not meant to be edited. This provides a stable and predictable system, carefully managed by Windows Update.
On Windows, anything outside of this can be installed to various user- and administrator-controlled folders like C:\Program Files or %appdata%. The analogue to this in Silverblue are the various mutable directories that are attached to /var, such as /home/, /home/foo/.local/bin/, /var/lib/flatpak/, /etc/
It should be noted that Windows Update is not a true immutable system, and has numerous disadvantages compared to a true immutable system, which are discussed below. But like Windows Update, Silverblue provides the benefit of being able to rollback to the last working system files if something breaks.
rpm-ostree? #

Continuing with the Windows analogy, sometimes a program wants to make deeper changes to the system. It can screw with .dll files and add .sys driver files to the Windows folder, which is a clunky but ultimately effective way to modify the Windows system. But it’s not great, on Windows you don’t have a vetted distribution that is designed to work with the base files, rather you have some possibly-broken drivers distributed by a vendor that doesn’t care if they break your system.
rpm-ostree is the analogue to this in Fedora Silverblue. It uses some special Linux kernel filesystem features to overlay extra files on top of the immutable base system. It can even be used to install out-of-tree drivers such as the NVidia drivers distributed from RPMFusion.
Generally rpm-ostree works pretty well. The reason rpm-ostree works so well is that the original system snapshot is constructed from an amalgamation of rpms from the Fedora distribution, and rpm-ostree is designed to be aware of how the original snapshot was constructed. It’s quite an elegant solution!
Flatpak? #
Flatpak is an incredible innovation in the Linux desktop space — it is an alternative way to install Linux desktop software that serves to alleviate deficiencies in the usual Linux distro model. In the Windows analogy, it is C:\Program Files, but much more sophisticated.
There are numerous benefits of Flatpak:
- It provides numerous security guarantees and an Android-like permission system. Flatpak (or another isolation technology) is absolutely essential for desktop Linux to be secure.
- It provides developer-to-user distribution. This is not always what we want — Linux distros maintain an adversarial relationship with upstream developers, and this is by design — it is a check on developers. Distros can patch stuff and make packages more compatible and cohesive with each other. But most of the time, the end user just wants fast updates, which Flatpak can do because software is published directly by the author.
- It provides consistent runtime libraries, meaning less DLL hell.
- It works well with immutable systems like Silverblue and Valve SteamOS, because it doesn’t modify the base system like
rpm-ostreedoes, and can carry libraries that are separate from the base system, while still having great integration with the platform.
So given the first three benefits, we should probably be using Flatpak to install certain applications, regardless of whether we’re using Silverblue or normal Fedora. Later in the tutorial we will be installing Firefox using Flatpak.
Now that we’re primed on the solution that OSTree, Silverblue, and Flatpak in combination presents, we’ll explore the Linux Ricing subculture and their requirements, which is the topic of this tutorial.
Linux Ricers, and ridding your system of bloat #
There is a subculture of the Linux community that wishes to completely customize their Linux system from the ground up. They are terrified of bloat & extra software that is not needed. So they have specific requirements and either run into issues with Silverblue, or more likely immutable Linux systems just weren’t marketed to them in the first place.
Silverblue Problem #1: Limited to GNOME and KDE #
The Silverblue OSTree distributions are only available in two flavors, GNOME and KDE. Don’t want GNOME’s gedit text editor? You could use rpm-ostree to remove it — this will mask the files from appearing, but they are still stored. But if you wanted to remove hundreds of GNOME packages, rpm-ostree will have to maintain a list of thousands of files to mask.
Linux ricers are often not using GNOME or KDE, they usually want to start from scratch using basic Xorg or Wayland wlroots-based software. They want to be able to directly manipulate a .xinitrc script. After freeing themselves of bloat, they want to install an assortment of “unix philosophy” system-level software that doesn’t easily fit into the Flatpak way of doing things.

This is why they are often using Archlinux, Gentoo, NixOS, Debian, and Voidlinux. These OSes plunge you into a command line so you can edit some text files to start a computing setup that you will hopefully be using for years. These are great operating systems, but they are not Fedora — they aren’t keeping up with the innovation in the Linux desktop space (except for NixOS perhaps), and at the same time they aren’t always so stable.
Silverblue Problem #2: Rollbacks & updates only somewhat help you fix /etc/ — its handling of /etc is not time machine snapshots
#
Each time you switch to a different snapshot, OSTree will do a three-way diff based merge on /etc/ to update its contents. If this three-way diff fails, you could get an /etc/ that is broken. A Linux ricer may wish to have their system packages and their /etc/ folder always in sync with the backup snapshots.
No, Silverblue won't give you this.
Silverblue Problem #3: Reboots required #
It’s not rational of course, but Linux ricers care about uptime. They know when a reboot is actually required vs. when the software is just being cautious. Fedora Silverblue requires reboots to make changes to rpm-ostree. Thankfully it does not have a Windows Vista style loading screen (it’s very quick to switch out the old snapshot for the new one) but still, it would be nice to only need to do this for rollbacks and new kernels.
Snapper #

Snapper is an OpenSUSE technology. OpenSUSE uses the Btrfs filesystem by default, which has copy-on-write and snapshots. Filesystem-level snapshots give you the capability to take a set of files and create a copy of it that doesn’t actually take up any extra space, until one version of the files is modified and diverges from the original.
Snapper puts the entire system into a Btrfs subvolume, and has hooks in tools like the package manager and YaST to automatically create a Btrfs snapshot every time you install a package or update the system.
For Linux ricers, their entire root filesystem is not just a set of changes from a base image (ala Silverblue), but rather is a constantly evolving system as they change customizations over the years. So Snapper is the perfect solution to have whole-system rollback capabilities on a heavily customized Linux desktop.
Tutorial: Set up a Fedora Minimal installation with Snapper #
This is a tutorial for those who wish to start with a minimal Fedora installation and set up minimalistic X11 window managers, all while having Snapper for whole-system rollback capabilities.
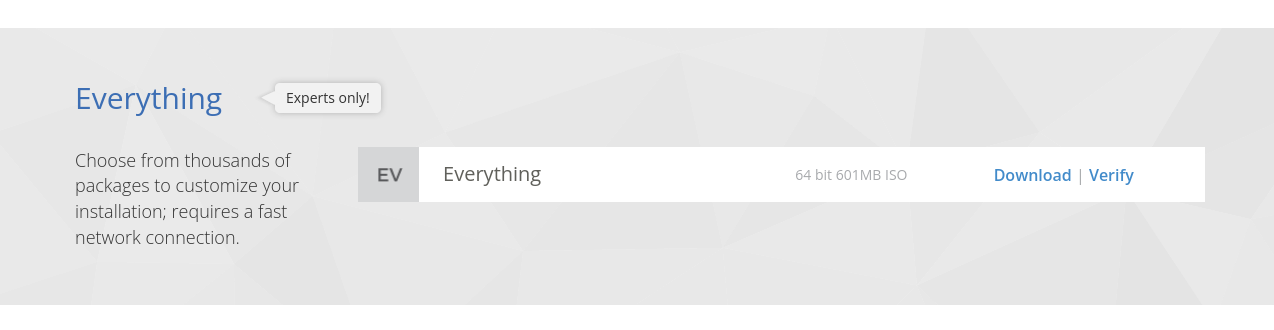
Download the “Everything” installation medium from the alternate downloads page for Fedora Linux. If you are not looking to create a minimal installation, you can just get Workstation or any of the other spins.
Boot the medium, select a language. Click on Software Selection.
If you are not interested in setting up a minimal installation, you can skip this step.
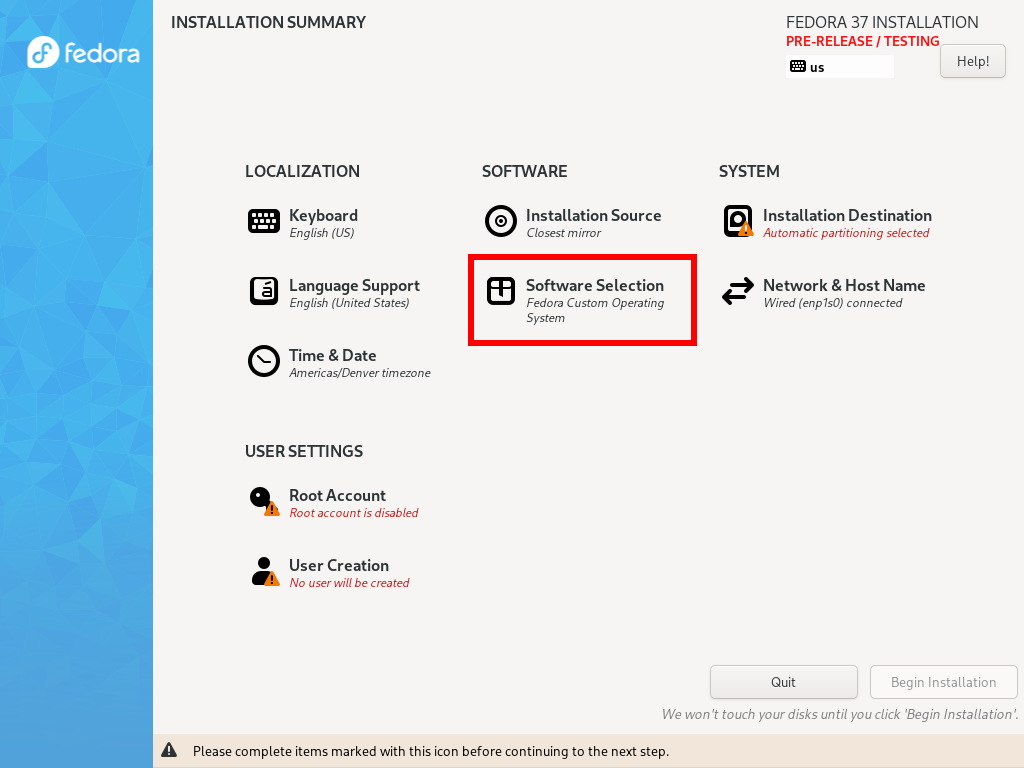
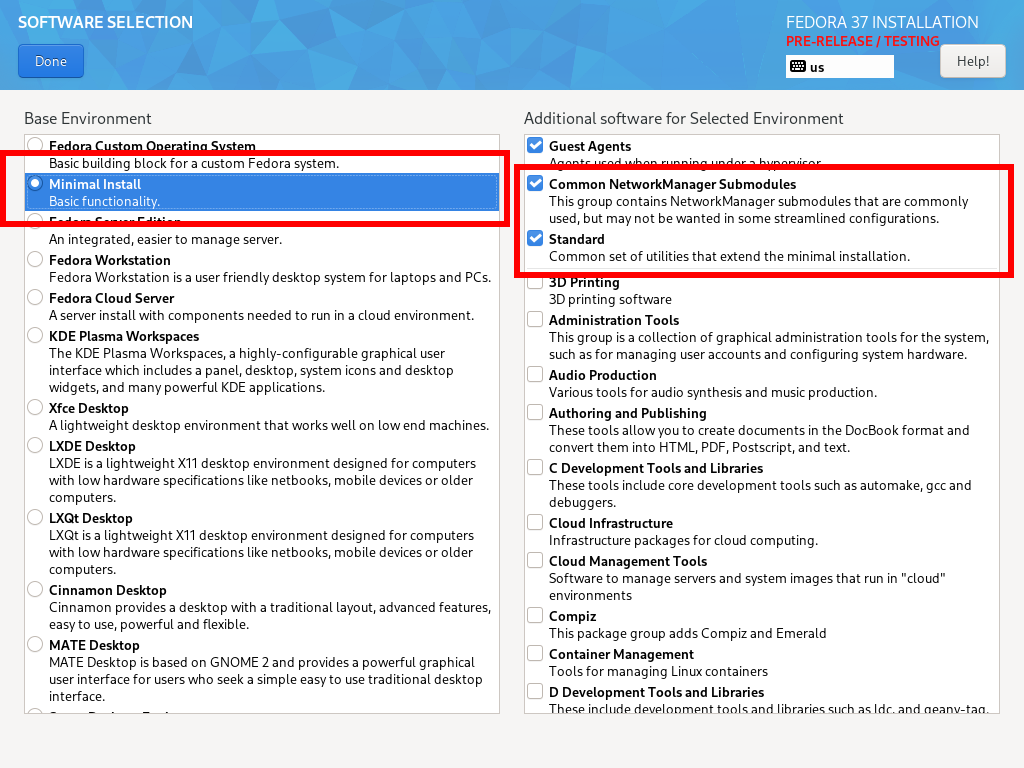
Select Minimal Install and add Common NetworkManager Submodules (will help you get Wifi working with nmcli or nmtui later on) and Standard.
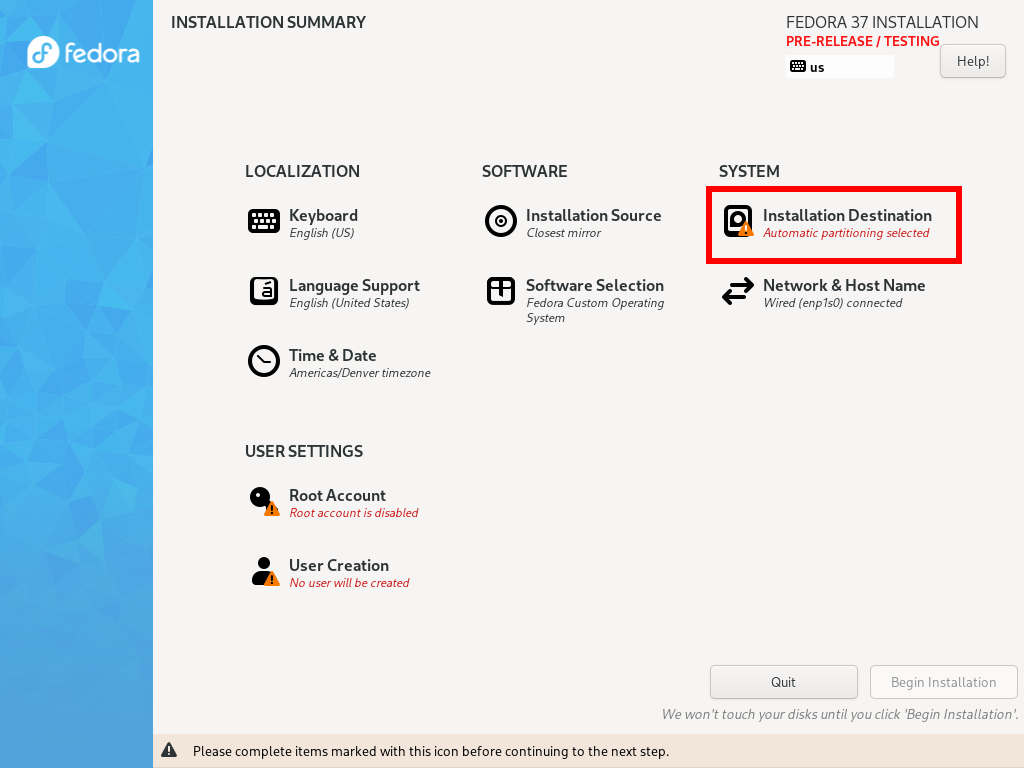
Click Installation Destination.
Click Advanced Custom (Blivet-GUI) and press Done.
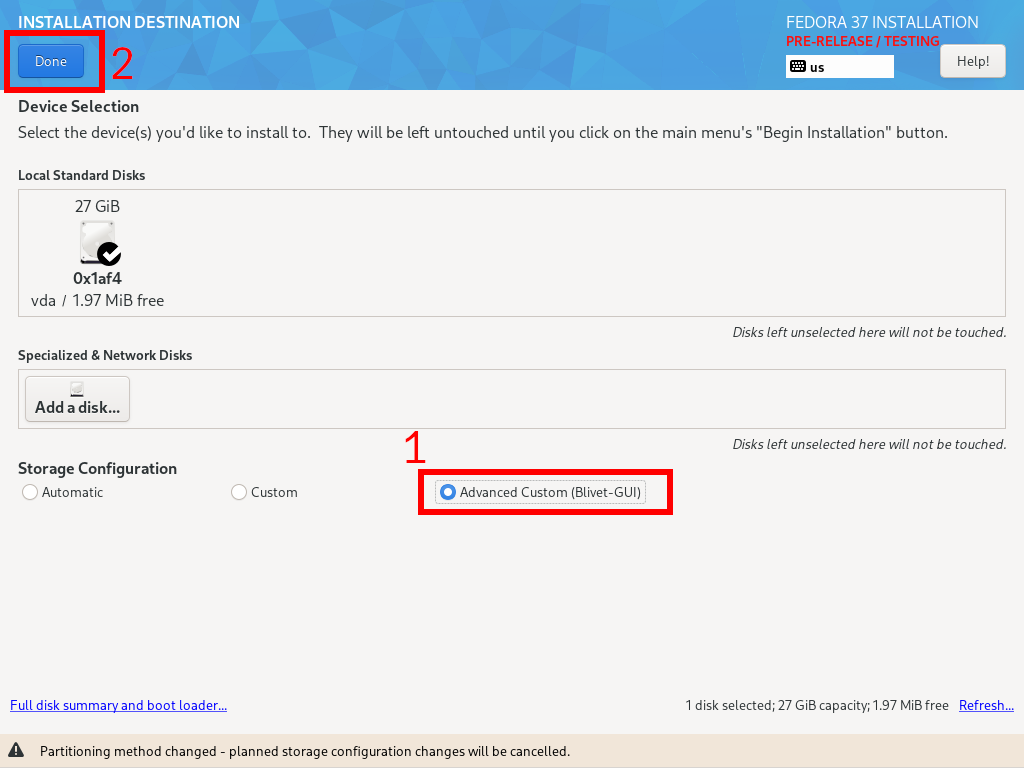
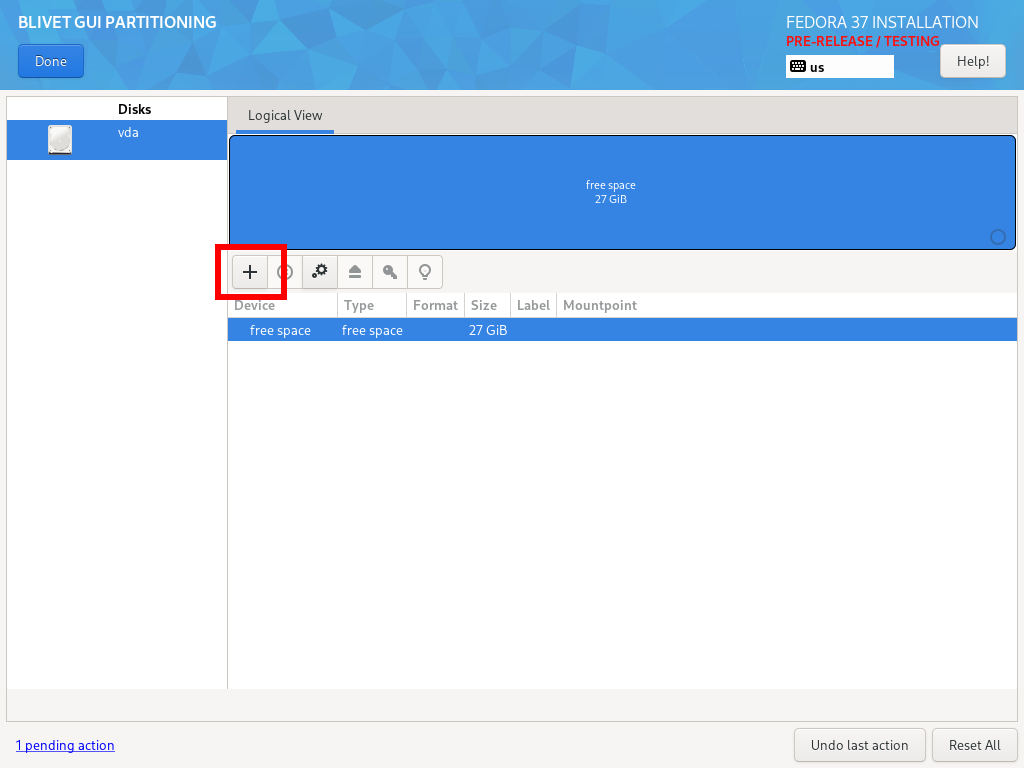
Verify that you are installing to the correct disk and click the plus icon.
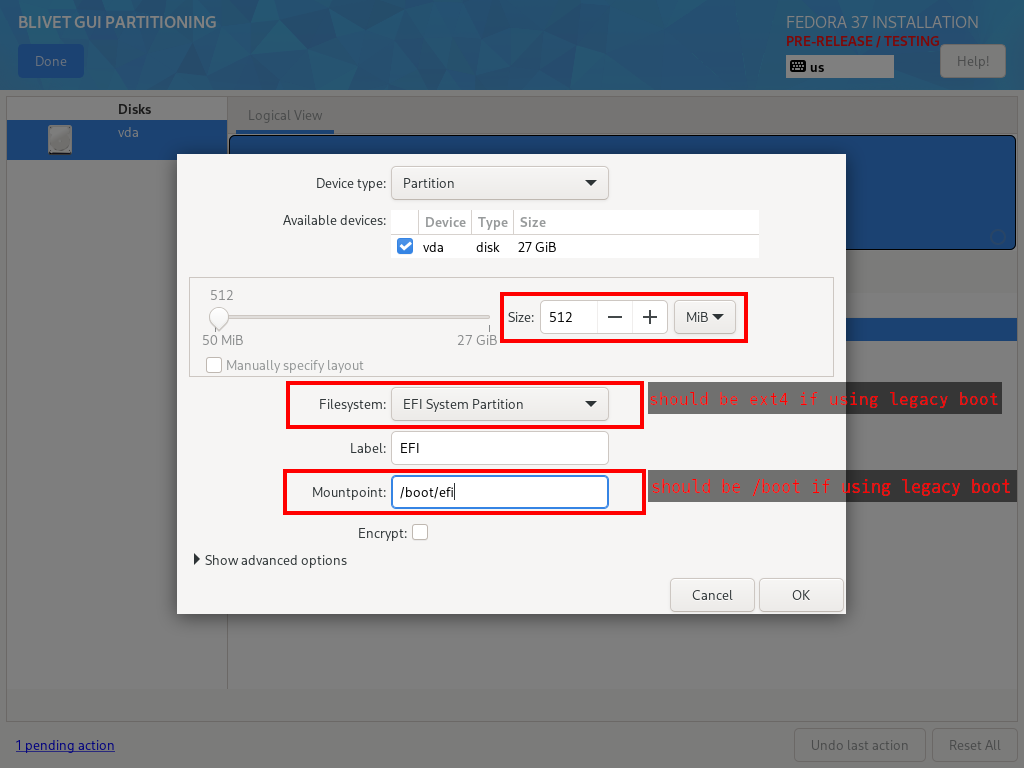
Add an EFI system partition, or a boot partition. If using UEFI, use the following configuration:
Size: 512 MiB
Filesystem: EFI System Partition
Mountpoint: /boot/efi
If using legacy boot, consider upping the size to 1 to 2 GiB, because Snapper will put multiple different kernel images on this partition. Note that for legacy boot you will also need a 1MiB BIOS boot partition as the first partition on the drive.
[If using legacy boot]
First partition:
    Size: 1 MiB
    Filesystem: BIOS Boot

Second partition:
    Size: 1536 MiB
    Filesystem: ext4
    Mountpoint: /boot
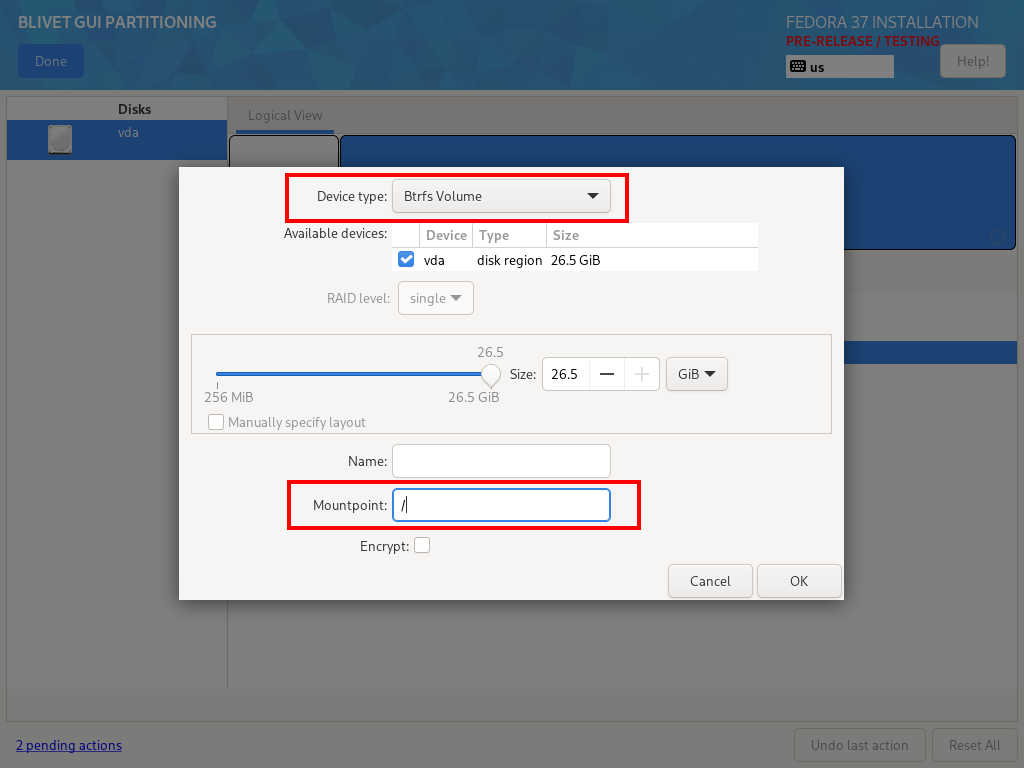
Add another partition.
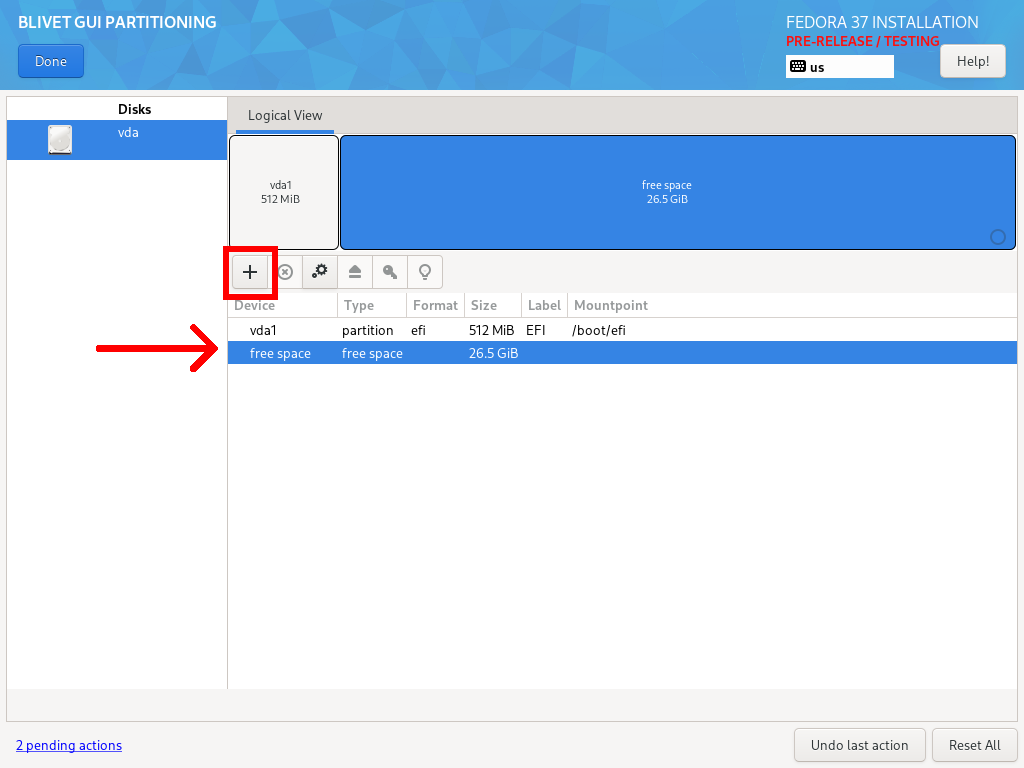
Using the following configuration, fill the rest of the available space:
Device Type: Btrfs Volume
Mountpoint: /
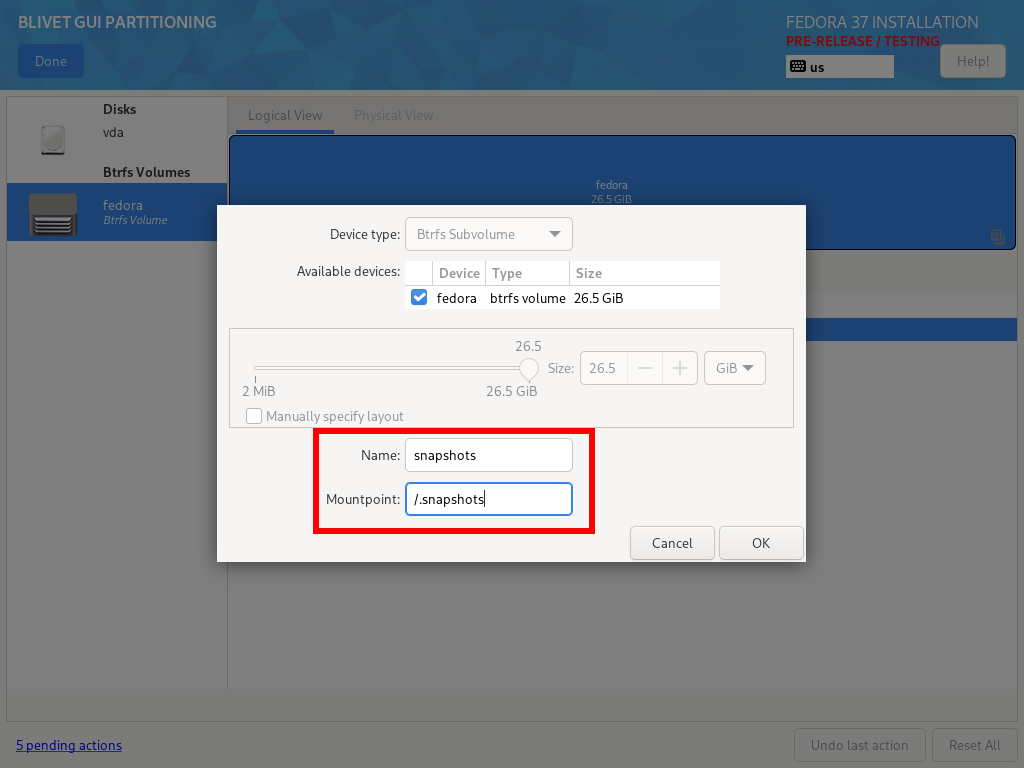
On the left column, click on the Btrfs subvolume you just created.
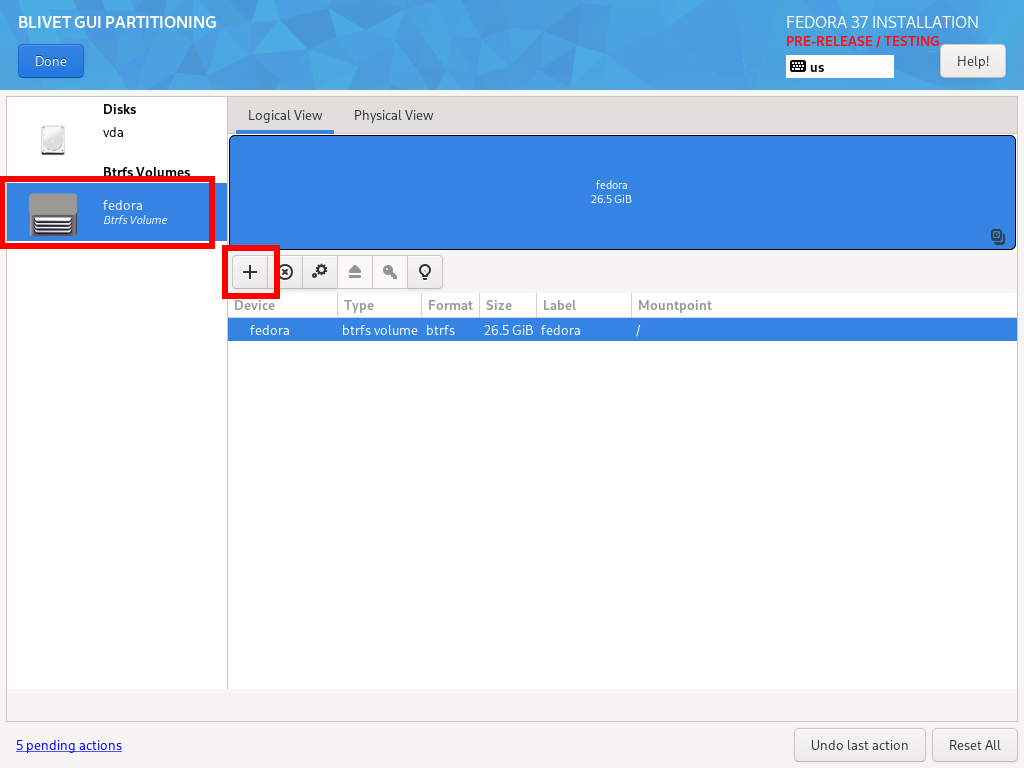
Create a subvolume to store Snapper snapshots. Name it snapper and let its mountpoint be /.snapshots
After this, you should create four other subvolumes, so there should be:
(This is the one you just created)
Name: snapshots
Mountpoint: /.snapshots
Name: home
Mountpoint: /home
Name: var-cache
Mountpoint: /var/cache
Name: var-tmp
Mountpoint: /var/tmp
Name: var-log
Mountpoint: /var/log
Name: plocate-data
Mountpoint: /var/lib/plocate
Optional: add these subvolumes for developer tools that store large amounts of frequently-updating data:
If you want to use libvirt and create virtual machine disk images
Name: libvirt-data
Mountpoint: /var/lib/libvirt
If you use the MySQL database software
Name: mysql-data
Mountpoint: /var/lib/mysql
If you use the MariaDB database sotware
Name: mariadb-data
Mountpoint: /var/lib/mariadb
If you use the PostgreSQL database software
Name: pgsql-data
Mountpoint: /var/lib/pgsql
If you use Redis key-value store software
Name: redis-data
Mountpoint: /var/lib/redis
If you use Docker containerization software
Name: docker-data
Mountpoint: /var/lib/docker
If you use Docker containerization software, or anything else that uses containerd
Name: containerd-data
Mountpoint: /var/lib/containerd
If you use lxd containerization software
Name: lxd-data
Mountpoint: /var/lib/lxd
If you use Toolbox or Podman
Name: containers-data
Mountpoint: /var/lib/containers
If you use the /srv directory
Name: srv
Mountpoint: /srv
You can always create these subvolumes later.
Alternatively, you might consider putting the entire /var folder on a separate subvolume, but by doing this you won’t include the Flatpak folder /var/lib/flatpak in the Snapper rollbacks.
The reason for all these subvolumes is to ensure Snapper is ignoring temporary files and other stuff that is changing constantly. We don’t need these to be considered part of the system state that Snapper needs to preserve.
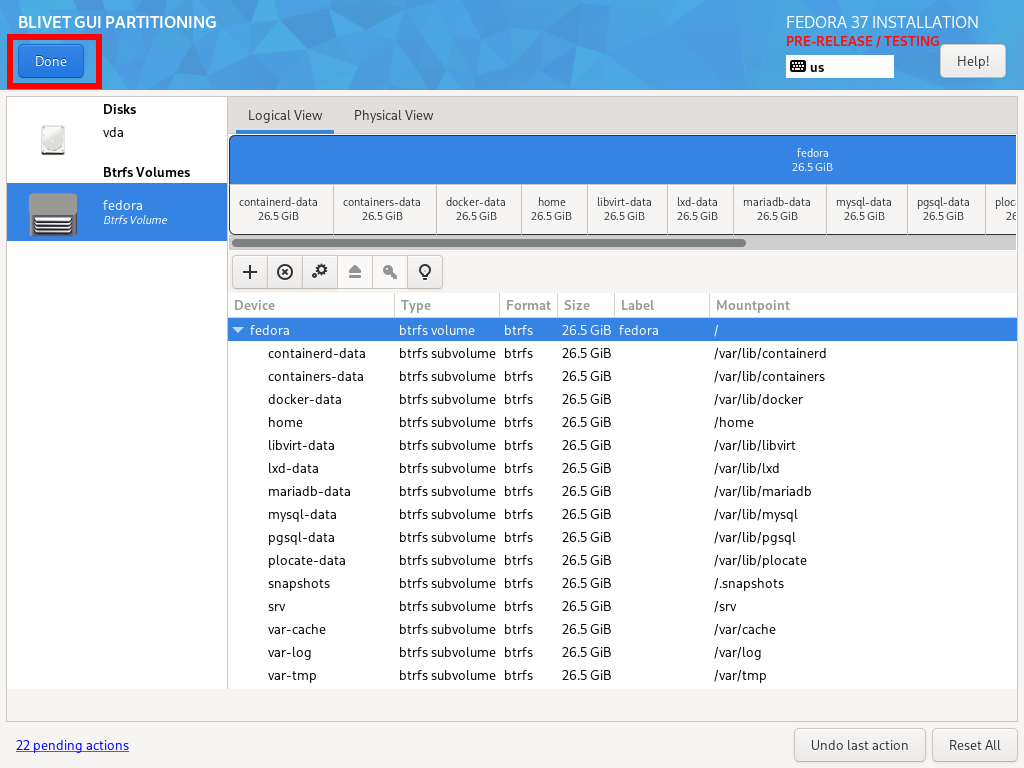
Here is what the final result should look like:

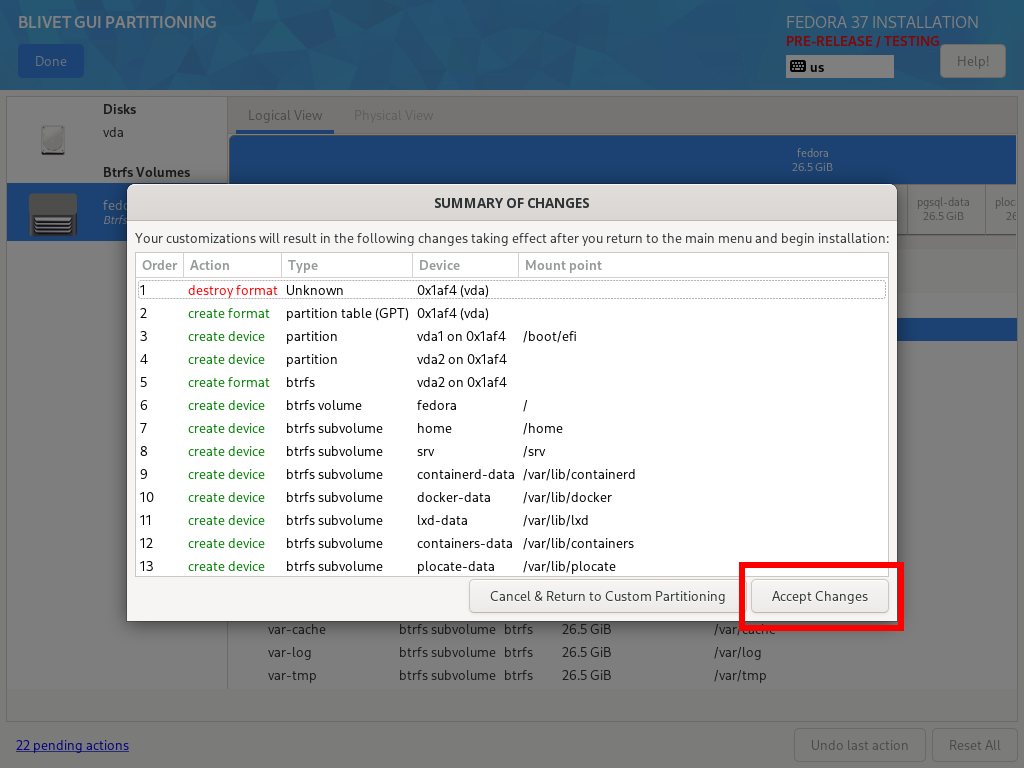
Click Done after you have verified everything is correct. Click Accept Changes to continue.
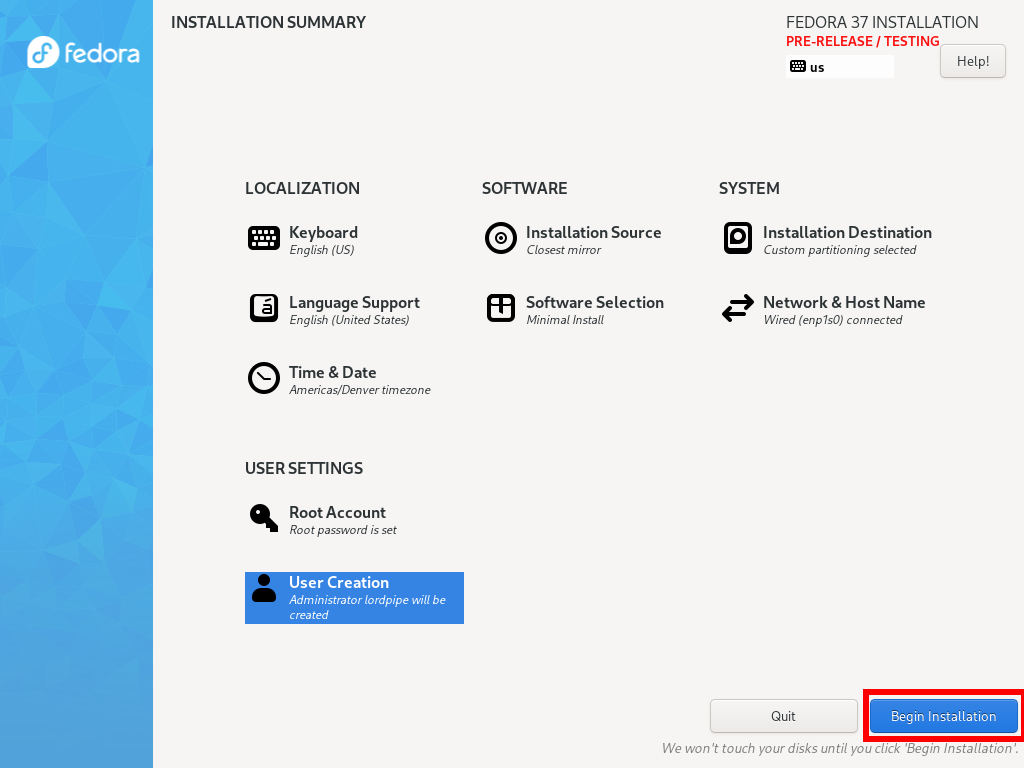
Create any accounts you need, and configure anything else you might need to change in the installation.

Begin the installation.
You have now installed a minimal Fedora setup!
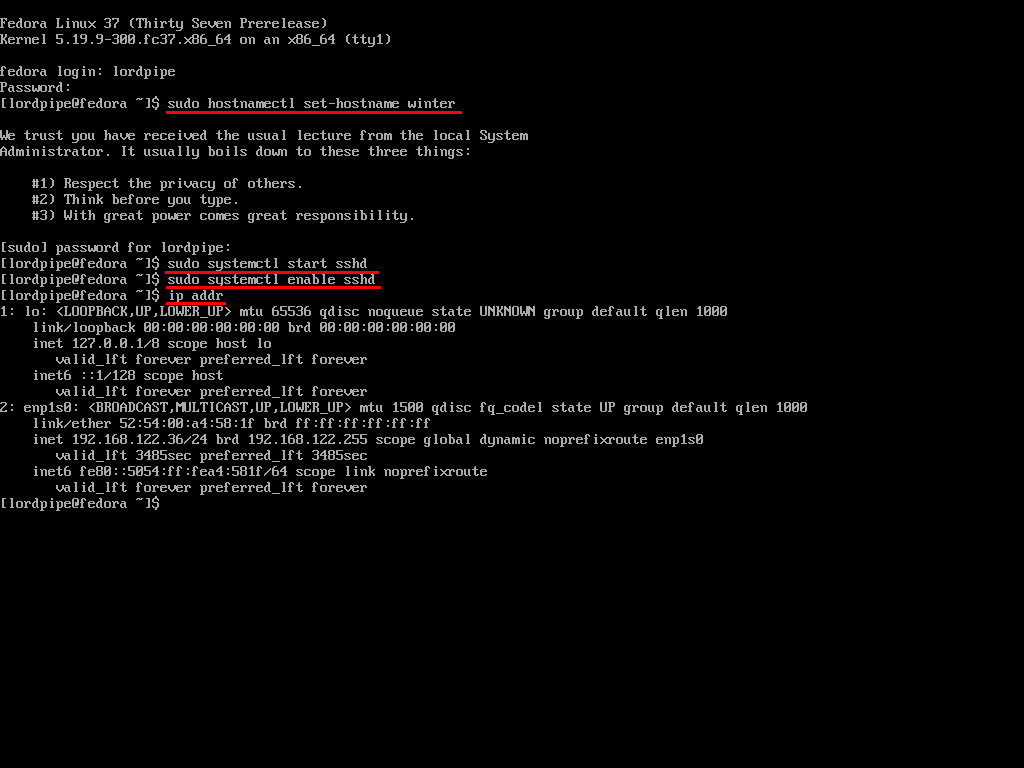
SSH daemon [OPTIONAL] #
When starting out on a newly set up minimal installation, you should probably ssh in from another PC rather than using the clunky Linux console. You can disable this later when you are done.
Assign a hostname:
# sudo hostnamectl set-hostname foobar
Start sshd:
# sudo systemctl start sshd
# sudo systemctl enable sshd
To show LAN IP:
# ip addr
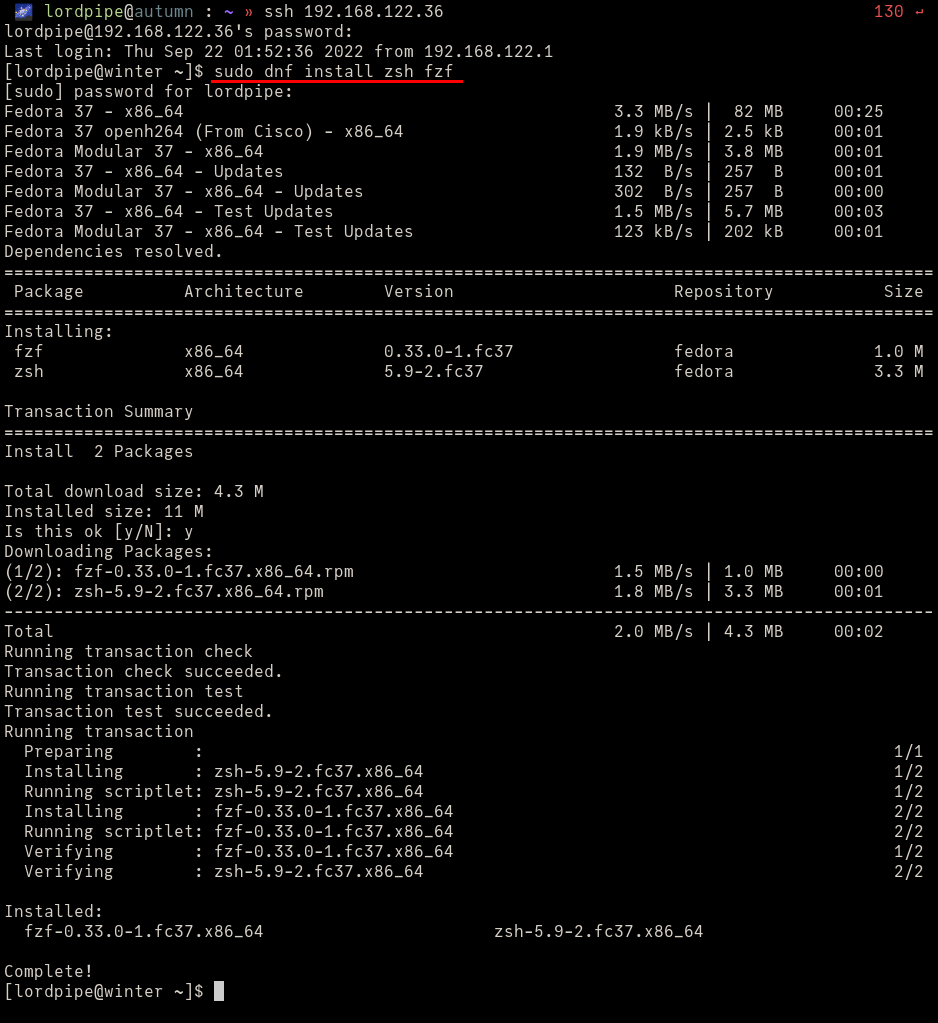
Shell ricing [OPTIONAL] #
Before we start, lets install some dependencies to get a nice comfortable zsh-based shell:
# sudo dnf install zsh fzf PackageKit-command-not-found util-linux-user sqlite git
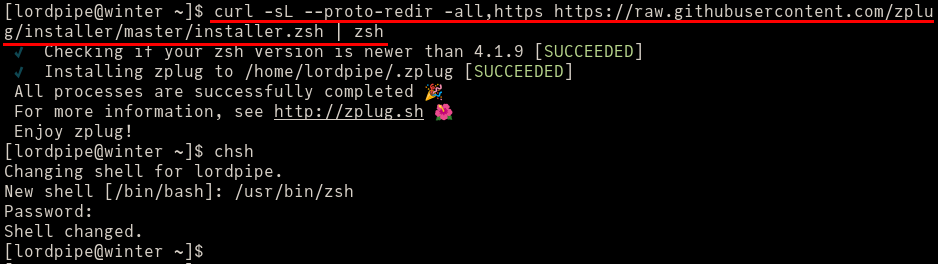
Install zplug, an easy scripts manager for zsh:
# curl -sL --proto-redir -all,https https://raw.githubusercontent.com/zplug/installer/master/installer.zsh | zsh
Run chsh and set the shell to /usr/bin/zsh. Log out and log back in.
Save the following to ~/.zshrc:
[[ -f ~/.profile ]] && source ~/.profile
source ~/.zplug/init.zsh

zplug themes/dpoggi, from:oh-my-zsh

if ! zplug check --verbose; then
    printf "Install? [y/N]: "
    if read -q; then
        echo; zplug install
    fi
fi

zplug load

source /usr/share/fzf/shell/key-bindings.zsh

HISTFILE=~/.zsh_history
HISTSIZE=100000000
SAVEHIST=100000000

bindkey -e
bindkey "^[[1;5C" forward-word
bindkey "^[[1;5D" backward-word
bindkey "^H" backward-kill-word
bindkey "^[[3;5~" kill-word
setopt BANG_HIST
setopt EXTENDED_HISTORY
setopt INC_APPEND_HISTORY
setopt SHARE_HISTORY
setopt HIST_EXPIRE_DUPS_FIRST
setopt HIST_IGNORE_DUPS
setopt HIST_IGNORE_ALL_DUPS
setopt HIST_FIND_NO_DUPS
setopt HIST_IGNORE_SPACE
setopt HIST_SAVE_NO_DUPS
setopt HIST_REDUCE_BLANKS
setopt HIST_VERIFY
setopt HIST_BEEP

autoload -Uz compinit
compinit
autoload -U bashcompinit
bashcompinit
We have a nice shell now, much more pleasant than the bash defaults. Feel free to add on to the zplug config.
Installing Snapper and setting up Grub integration #
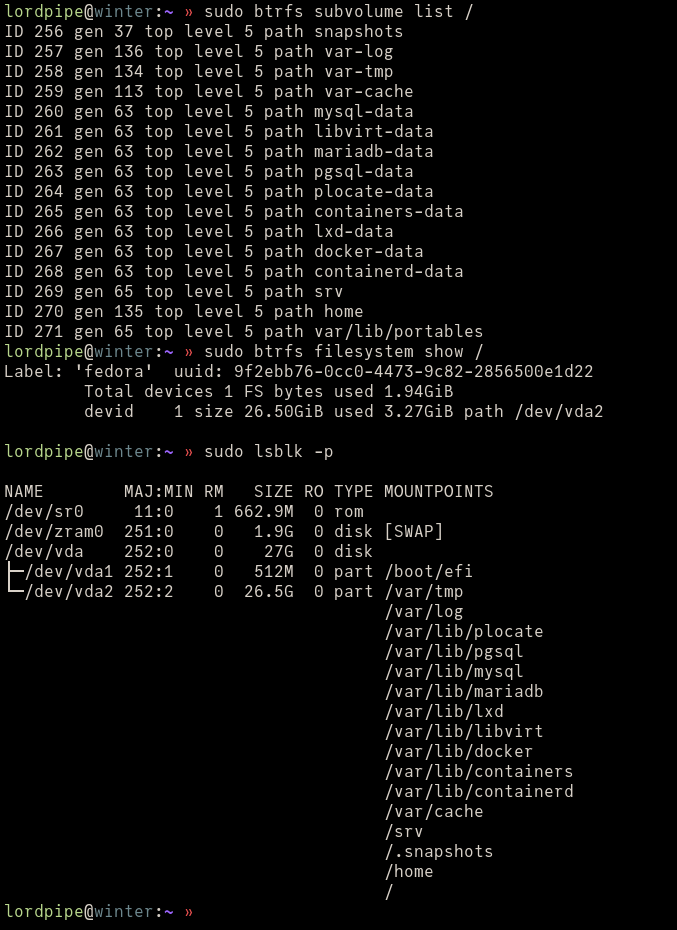
We can inspect how the subvolumes are set up:
# sudo btrfs subvolume list /
# sudo btrfs filesystem show /
# sudo lsblk -p
# cat /etc/fstab
/etc/fstab contents example:
UUID=FD87-791A          /boot/efi               vfat    umask=0077,shortname=winnt 0 2
UUID=9f2ebb76-0cc0-4473-9c82-2856500e1d22 /                       btrfs   defaults        0 0
UUID=9f2ebb76-0cc0-4473-9c82-2856500e1d22 /.snapshots             btrfs   subvol=snapshots,compress=zstd:1 0 0
UUID=9f2ebb76-0cc0-4473-9c82-2856500e1d22 /home                   btrfs   subvol=home,compress=zstd:1 0 0
UUID=9f2ebb76-0cc0-4473-9c82-2856500e1d22 /srv                    btrfs   subvol=srv,compress=zstd:1 0 0
UUID=9f2ebb76-0cc0-4473-9c82-2856500e1d22 /var/cache              btrfs   subvol=var-cache,compress=zstd:1 0 0
UUID=9f2ebb76-0cc0-4473-9c82-2856500e1d22 /var/lib/containerd     btrfs   subvol=containerd-data,compress=zstd:1 0 0
UUID=9f2ebb76-0cc0-4473-9c82-2856500e1d22 /var/lib/containers     btrfs   subvol=containers-data,compress=zstd:1 0 0
UUID=9f2ebb76-0cc0-4473-9c82-2856500e1d22 /var/lib/docker         btrfs   subvol=docker-data,compress=zstd:1 0 0
UUID=9f2ebb76-0cc0-4473-9c82-2856500e1d22 /var/lib/libvirt        btrfs   subvol=libvirt-data,compress=zstd:1 0 0
UUID=9f2ebb76-0cc0-4473-9c82-2856500e1d22 /var/lib/lxd            btrfs   subvol=lxd-data,compress=zstd:1 0 0
UUID=9f2ebb76-0cc0-4473-9c82-2856500e1d22 /var/lib/mariadb        btrfs   subvol=mariadb-data,compress=zstd:1 0 0
UUID=9f2ebb76-0cc0-4473-9c82-2856500e1d22 /var/lib/mysql          btrfs   subvol=mysql-data,compress=zstd:1 0 0
UUID=9f2ebb76-0cc0-4473-9c82-2856500e1d22 /var/lib/pgsql          btrfs   subvol=pgsql-data,compress=zstd:1 0 0
UUID=9f2ebb76-0cc0-4473-9c82-2856500e1d22 /var/lib/plocate        btrfs   subvol=plocate-data,compress=zstd:1 0 0
UUID=9f2ebb76-0cc0-4473-9c82-2856500e1d22 /var/log                btrfs   subvol=var-log,compress=zstd:1 0 0
UUID=9f2ebb76-0cc0-4473-9c82-2856500e1d22 /var/tmp                btrfs   subvol=var-tmp,compress=zstd:1 0 0
If your setup looks roughly like this, you can continue.
First, if you created these, you may wish to configure some of the heaviest /var/ subvolumes to disable copy-on-write. Some database software doesn’t play well with it and causes performance issues.
# sudo chattr -R +C /var/lib/libvirt
# sudo chattr -R +C /var/lib/mysql
# sudo chattr -R +C /var/lib/mariadb
# sudo chattr -R +C /var/lib/pgsql

Allow for snapshot booting by editing /etc/default/grub. Add the following line:
[...]
SUSE_BTRFS_SNAPSHOT_BOOTING="true"
Update grub configuration to reflect this change:
# sudo grub2-mkconfig -o /boot/grub2/grub.cfg

Reboot:
# sudo reboot
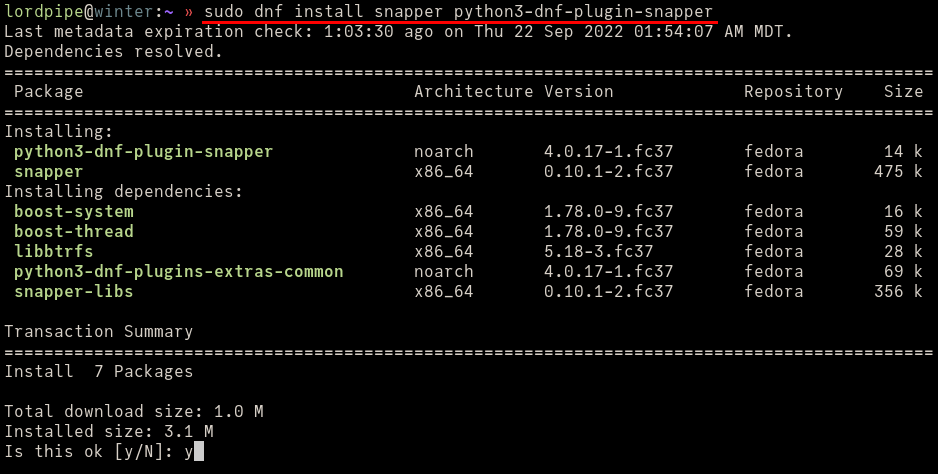
Install Snapper, and the dnf hooks for automatically creating before/after snapshots every time packages are changed:
# sudo dnf install snapper python3-dnf-plugin-snapper inotify-tools
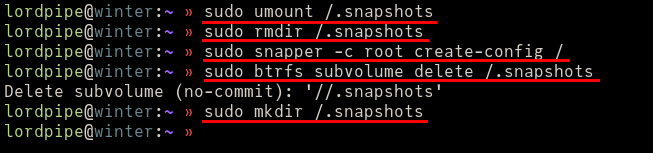
Delete and recreate the /.snapper subvolume to get snapper to take over it.
# sudo umount /.snapshots
# sudo rmdir /.snapshots
# sudo snapper -c root create-config /
# sudo btrfs subvolume delete /.snapshots
# sudo mkdir /.snapshots
Reload fstab:
# sudo systemctl daemon-reload
# sudo mount -a
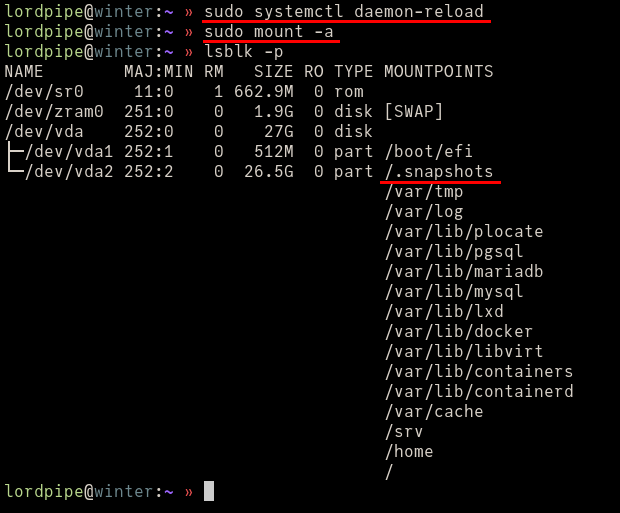
You can verify that the subvolume is mounted correctly:
# lsblk -p
Configure Snapper to allow your account to administrate it:
# sudo snapper -c root set-config ALLOW_USERS=$USER SYNC_ACL=yes
# sudo chown -R :$USER /.snapshots

Unhide the grub menu:
# sudo grub2-editenv - unset menu_auto_hide
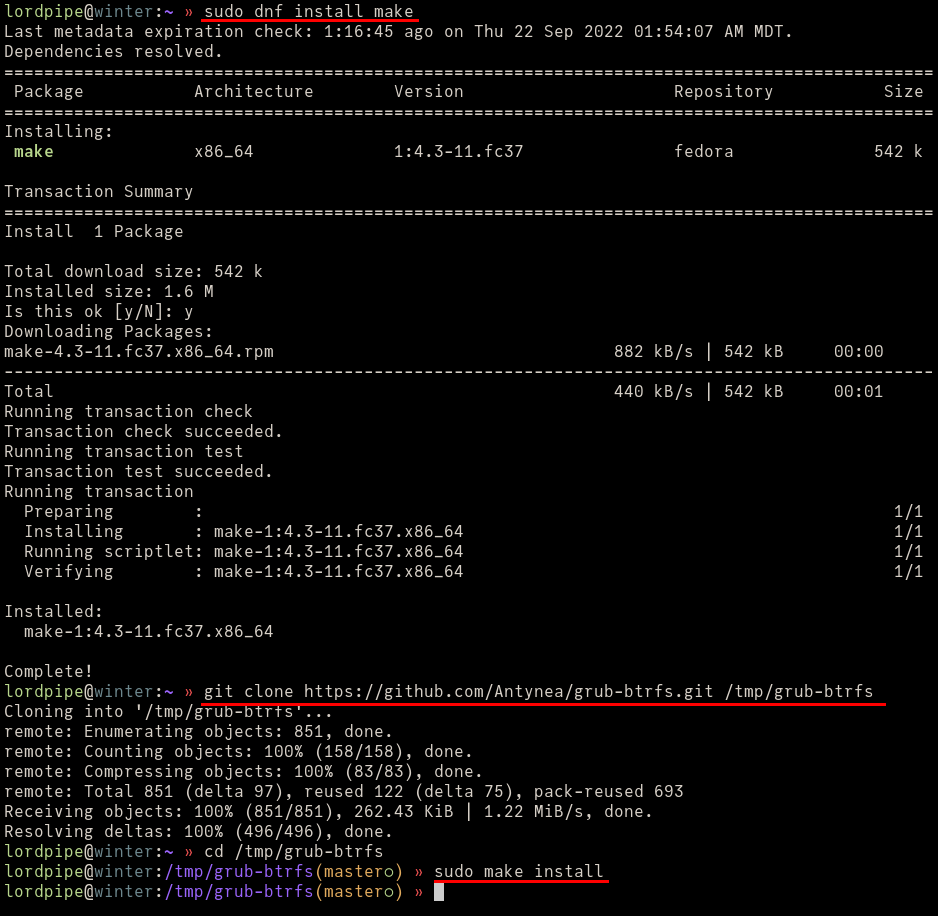
Install grub-btrfs, a tool to automatically generate grub listings for Snapper snapshots. This is a script that works transparently to update grub every time /.snapshots is modified, similar to how OpenSUSE works.
# sudo dnf install make
# git clone https://github.com/Antynea/grub-btrfs.git /tmp/grub-btrfs
# cd /tmp/grub-btrfs
# sudo make install
Edit the config file for grub-btrfs at /etc/default/grub-btrfs/config.
Edit #1: Make sure GRUB_BTRFS_MKCONFIG is uncommented and set to /usr/sbin/grub2-mkconfig
GRUB_BTRFS_MKCONFIG="/usr/sbin/grub2-mkconfig"
Edit #2: Make sure GRUB_BTRFS_SCRIPT_CHECK is uncommented and set to grub2-script-check
GRUB_BTRFS_SCRIPT_CHECK="grub2-script-check"
Edit #3: Make sure GRUB_BTRFS_GRUB_DIRNAME is uncommented and set to /boot/grub2. Do not follow the Fedora advice in the commented out section, it is meant for Fedora 33 and earlier.
GRUB_BTRFS_GRUB_DIRNAME="/boot/grub2"
In patch format:
--- /tmp/a
+++ /tmp/b
@@ -90,7 +90,7 @@
 # Might be grub2 on some systems.
 # For example, on Fedora with EFI : "/boot/efi/EFI/fedora"
 # Default: "/boot/grub"
-#GRUB_BTRFS_GRUB_DIRNAME="/boot/grub2"
+GRUB_BTRFS_GRUB_DIRNAME="/boot/grub2"

 # Location of kernels/initramfs/microcode.
 # Use by "grub-btrfs" to detect the boot partition and the location of kernels/initrafms/microcodes.
@@ -104,13 +104,13 @@
 # For example, on Fedora : "/sbin/grub2-mkconfig"
 # You can use only name or full path.
 # Default: grub-mkconfig
-#GRUB_BTRFS_MKCONFIG=/usr/bin/grub2-mkconfig
+GRUB_BTRFS_MKCONFIG="/usr/sbin/grub2-mkconfig"

 # Name of grub-script-check command, use by "grub-btrfs"
 # Might be 'grub2-script-check' on some systems (Fedora ...)
 # For example, on Fedora : "grub2-script-check"
 # Default: grub-script-check
-#GRUB_BTRFS_SCRIPT_CHECK=grub2-script-check
+GRUB_BTRFS_SCRIPT_CHECK="grub2-script-check"

 # Path of grub-mkconfig_lib file, use by "grub-btrfs"
 # Might be '/usr/share/grub2/grub-mkconfig_lib' on some systems (Opensuse ...)
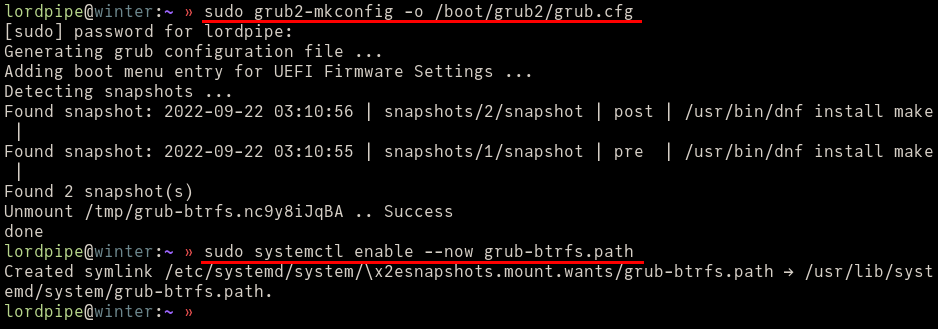
Once you are done, regenerate the grub config and enable the systemd unit for watching /.snapshots in real time:
# sudo grub2-mkconfig -o /boot/grub2/grub.cfg
# sudo systemctl enable --now grub-btrfsd.service
Using Snapper #
Success, you have now installed Snapper! You can use snapper ls to see the snapshots it has created:
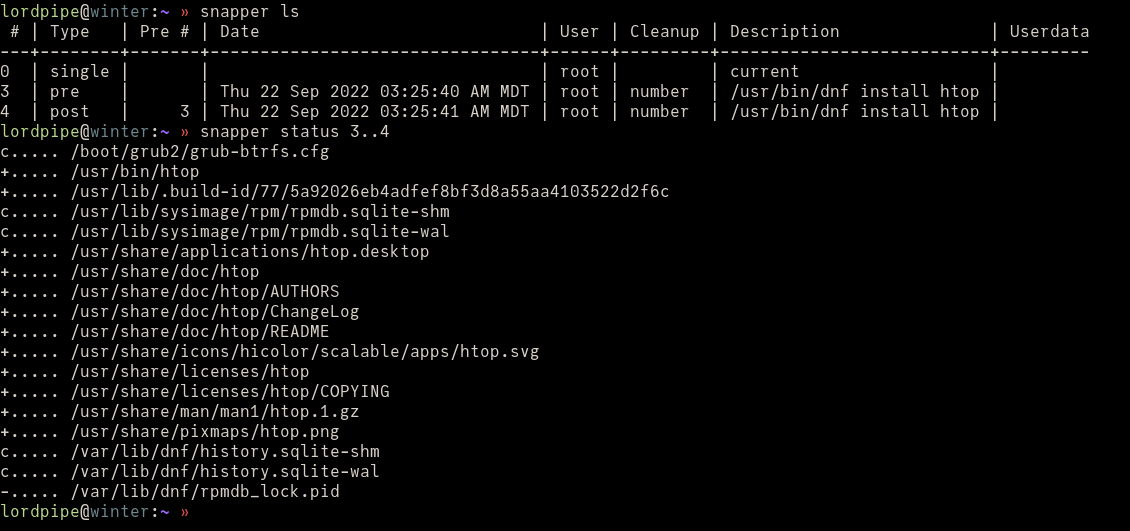
A snapshot will be generated every time you run a dnf command that changes the system. You can access these snapshots from the grub menu.
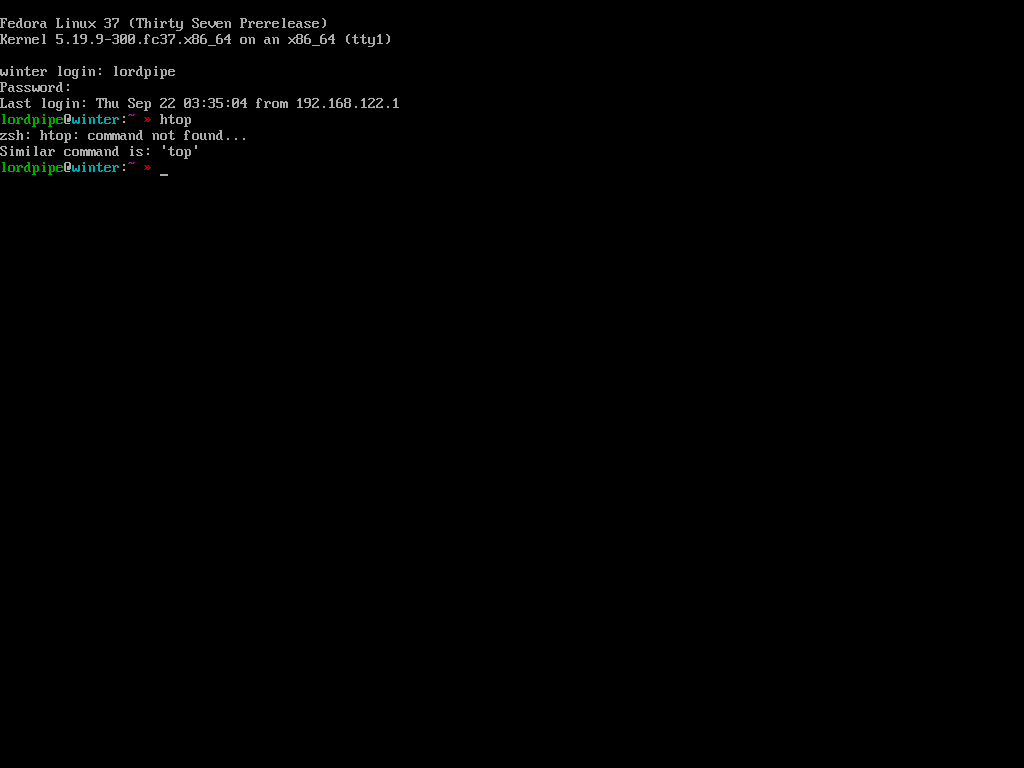
By selecting this, you will boot into a read-only system where you can verify your system is in a working state before switching to it. As an example, we rollback to a snapshot before htop was installed:

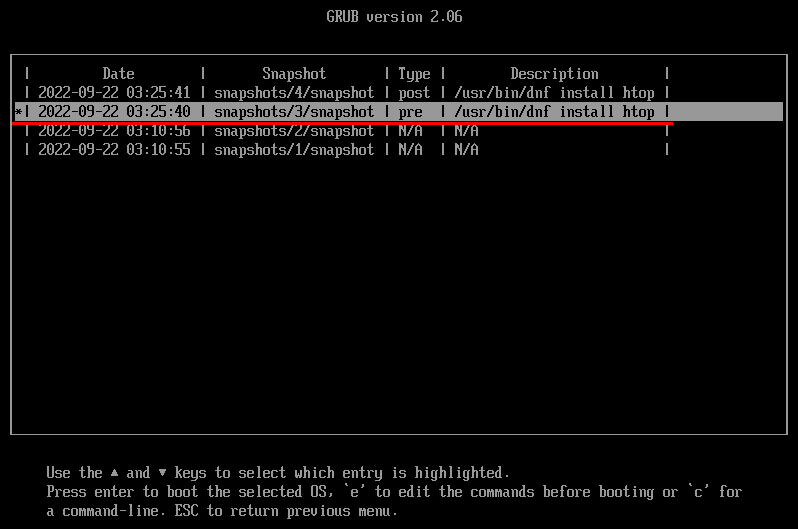
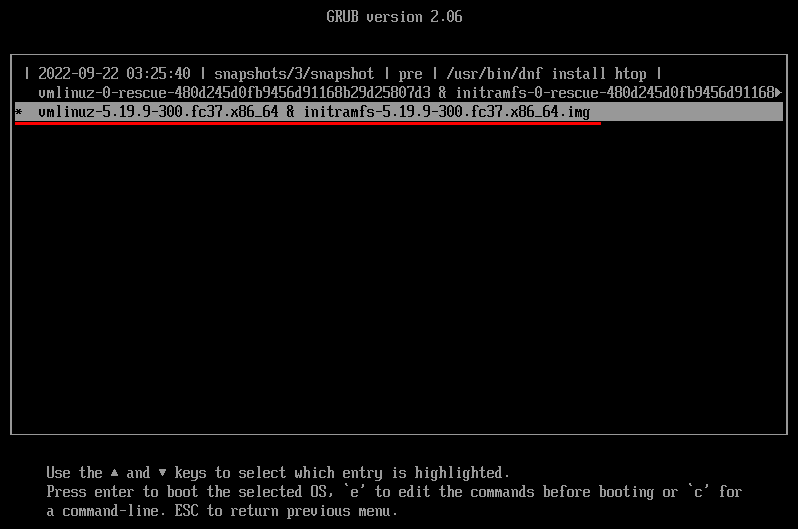
htop is gone:
To rollback to it, you can run this command, where <NUM> is the id number of the snapshot you wish to return to. You can use --ambit classic to switch to a read-write copy of the chosen snapshot. --ambit transactional is equivalent to selecting the read-only grub entry.
# snapper --ambit classic rollback <NUM>
Refer to the official Snapper Tutorial for advanced usage.
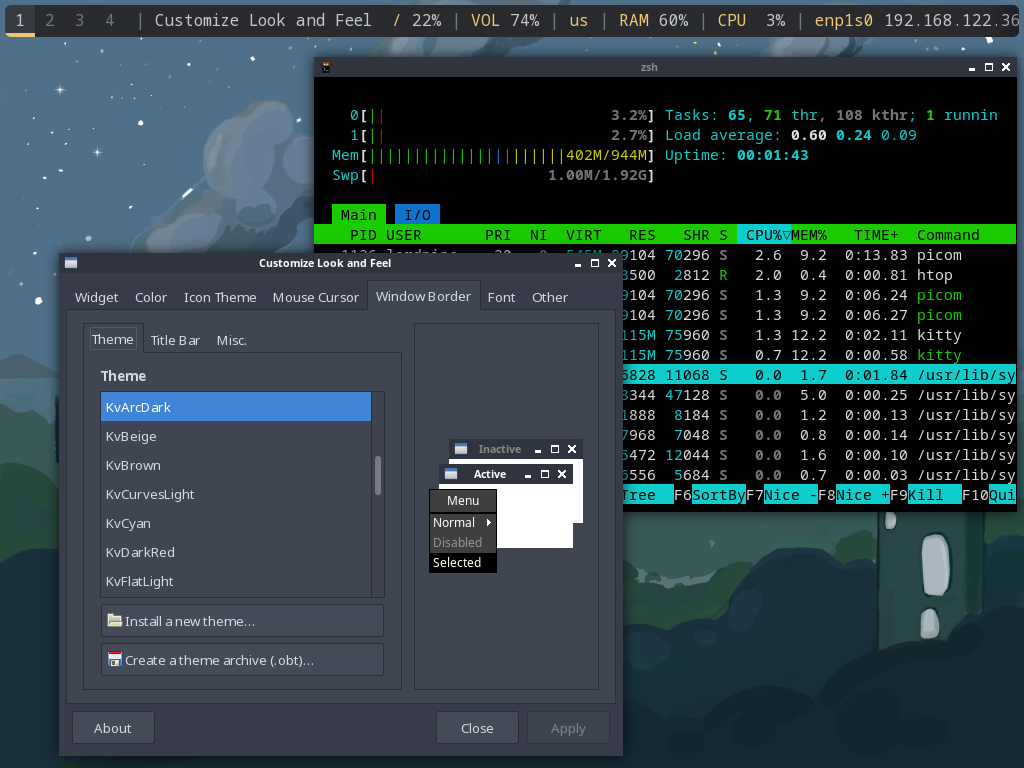
Ricing an X11 desktop [OPTIONAL] #
Now that we have a minimal Fedora setup, we can start installing things. In this example we’ll install SDDM with Openbox and Polybar. First we’ll be using some package groups to make the basics easy:
# sudo dnf install @base-x "@Hardware Support" "@Fonts" "@Input Methods" "@Multimedia" "@Printing Support"
Then we install the meat of what we want:
# sudo dnf install sddm polybar openbox lxappearance lxappearance-obconf obconf picom
We’ll grab some themes:
# sudo dnf install sddm-themes arc-theme arc-kde lxappearance feh
Install some applications:
# sudo flatpak remote-add --if-not-exists flathub https://flathub.org/repo/flathub.flatpakrepo
# sudo flatpak install org.mozilla.firefox
# sudo dnf install kitty neofetch
Add autostart script for Openbox at ~/.config/openbox/autostart
#!/bin/bash
picom &
polybar &
feh --bg-scale /usr/share/backgrounds/f37/default/f37-02-night.png &
Start sddm on boot:
sudo systemctl enable sddm
sudo systemctl start sddm
sudo systemctl set-default graphical.target
© lordpipe
Licensed CC BY — copy this document for your own use.